# 实验目的
- 了解文件系统的基本概念和作用。
- 了解普通磁盘的基本结构和读写方式。
- 了解实现设备驱动的方法。
- 掌握并实现文件系统服务的基本操作。
- 了解微内核的基本设计思想和结构。
# 文件系统概述
# IDE 磁盘驱动
本次实验中我们使用 内存映射 I/O 技术 (MMIO) 来实现一个 IDE 磁盘的驱动。
IDE 具体的意思是 Integrated Driver Electronics ,字面意思指这种磁盘的控制器和盘体集合在一起
本次的驱动程序 完全运行在用户态下,因此需要两个新的系统调用 sys_write_dev 和 sys_read_dev 的支持的,它们实现了用户态下对设备的读写。
# sys_write_dev 函数
int sys_write_dev(u_int va, u_int pa, u_int len); |
功能:将数据从虚拟地址 va 写入设备的物理地址 pa 。
参数说明
va:源数据的起始虚拟地址(需要检查合法性)。pa:目标设备的物理地址(需要检查是否在合法设备范围内)。len:数据长度(只能是 1、2 或 4 字节)。
执行流程
- 检查参数合法性:
- 使用
is_illegal_va_range(va, len)检查va是否合法(是否属于用户可访问范围)。 - 使用
is_illegal_dev_range(pa, len)检查pa是否在设备允许的地址范围内(如控制台或磁盘)。 - 检查
va是否按len对齐(va % len == 0),确保访问不会跨边界。
- 使用
- 根据
len选择写入方式: - 返回值:
- 成功时返回
0。 - 失败时返回
-E_INVAL(地址非法或长度错误)。
- 成功时返回
# sys_read_dev 函数
int sys_read_dev(u_int va, u_int pa, u_int len); |
功能:从设备的物理地址 pa 读取数据到虚拟地址 va
与 sys_write_dev 类似,不再赘述
# Exercise 5.1
int sys_write_dev(u_int va, u_int pa, u_int len) | |
{ | |
/* Exercise 5.1: Your code here. (1/2) */ | |
if (is_illegal_va_range(va, len) || is_illegal_dev_range(pa, len) || va % len != 0) | |
{ | |
return -E_INVAL; | |
} | |
if (len == 4) | |
{ | |
iowrite32(*(uint32_t *)va, pa); | |
} | |
else if (len == 2) | |
{ | |
iowrite16(*(uint16_t *)va, pa); | |
} | |
else if (len == 1) | |
{ | |
iowrite8(*(uint8_t *)va, pa); | |
} | |
else | |
{ | |
return -E_INVAL; | |
} | |
return 0; | |
} |
int sys_read_dev(u_int va, u_int pa, u_int len) | |
{ | |
/* Exercise 5.1: Your code here. (2/2) */ | |
if (is_illegal_va_range(va, len) || is_illegal_dev_range(pa, len) || va % len != 0) | |
{ | |
return -E_INVAL; | |
} | |
if (len == 4) | |
{ | |
*(uint32_t *)va = ioread32(pa); | |
} | |
else if (len == 2) | |
{ | |
*(uint16_t *)va = ioread16(pa); | |
} | |
else if (len == 1) | |
{ | |
*(uint8_t *)va = ioread8(pa); | |
} | |
else | |
{ | |
return -E_INVAL; | |
} | |
return 0; | |
} |
# Exercise 5.2
int syscall_write_dev(void *va, u_int dev, u_int size) | |
{ | |
/* Exercise 5.2: Your code here. (1/2) */ | |
return msyscall(SYS_write_dev, va, dev, size); | |
} | |
int syscall_read_dev(void *va, u_int dev, u_int size) | |
{ | |
/* Exercise 5.2: Your code here. (2/2) */ | |
return msyscall(SYS_read_dev, va, dev, size); | |
} |
# 内存映射 I/O (MMIO)
硬件设备上具有一些寄存器, CPU 通过读写这些寄存器来和硬件设备进行通信,因此这些寄存器被称为 I/O 端口。而这些寄存器并不是直接以寄存器的方式展现给 CPU 的,而是映射到内存的某个位置。当 CPU 读写这块内存的时候,实际上读写了相应的 I/O 端口
在我们实验所使用的 MIPS 结构中,这种机制更为简单。其在 kseg0 和 kseg1 段里从硬件的层次可预知地实现了物理地址到内核虚拟地址的转换,这使得所有 I/O 设备都可以存放在这段空间里,并通过确定的映射关系计算出对应的物理地址。而我们用 kseg1 来进行转换,而不用 kseg0,因为 kseg0 需要经过 cache 缓存,导致不可预知的问题。
进一步,在我们的实验中,模拟器中 I/O 设备的物理地址是完全固定的,我们的驱动程序就只需要对特定内核虚拟地址进行读写即可
# IDE 磁盘操作
磁盘的物理结构在 CO 和 OO 的理论课上已经学过,这里不再赘述
扇区( sector )是磁盘读写的基本单位, MALTA 上的 PIIX4 也提供了对扇区进行操作的基本方法。通过读写 PIIX4 的特定寄存器,我们可以实现以扇区为最小单元的读写
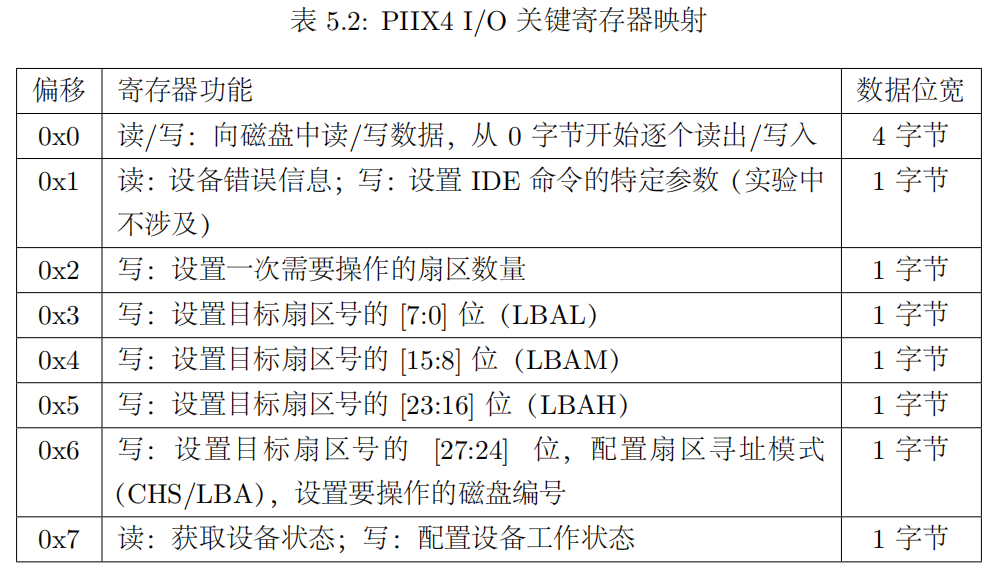
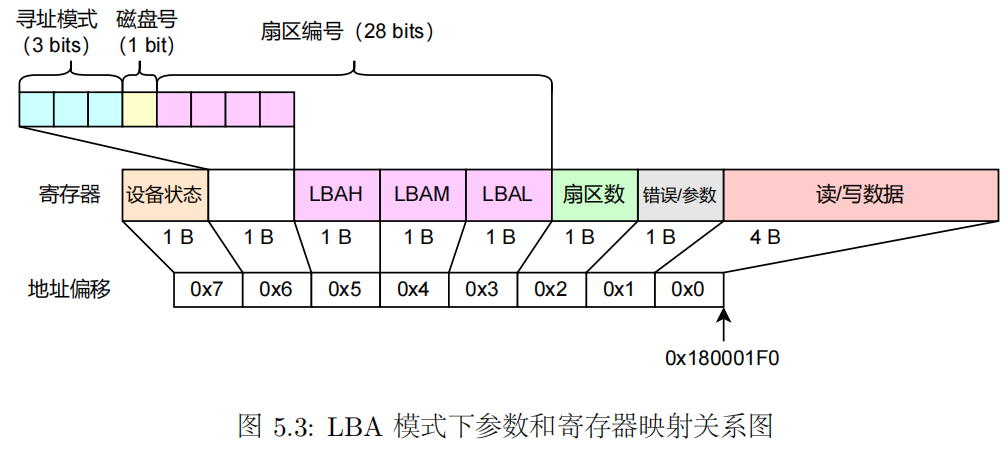
在实验中我们采用逻辑块寻址( Logical Block Addressing,LBA )的方式来进行扇区寻址。在 LBA 模式下, IDE 设备将磁盘看作一个线性的字节序列,每个扇区都有一个唯一的编号,只需要设置目标扇区编号,就可以完成磁盘的寻址。在我们的实验中,扇区编号有 28 位,因此最多可以寻址 2^28 个扇区,即 128 GB 的磁盘空间。该模式下,磁盘操作参数和寄存器映射的关系如图所示
# 驱动程序编写
驱动程序(Driver)是操作系统中的一种特殊程序,它的核心作用是 让操作系统能够管理和控制硬件设备。简单来说,驱动程序是 硬件和操作系统之间的 “翻译官”,它屏蔽了底层细节,向操作系统上层(如文件系统)提供统一的调用接口(如 read / write )
# ide_read 函数、ide_write 函数
这两个函数 ide_read 和 ide_write 是用于与 IDE 磁盘进行数据读写的底层驱动函数,通过 PIO(Programmed I/O)模式直接与磁盘控制器交互
参数说明 :
diskno:磁盘编号(0 或 1,因为最多支持 2 个 IDE 磁盘)。secno:起始扇区号(LBA 逻辑块寻址)。dst:目标内存缓冲区,存放读取的数据。src:源数据,存放将要写入。nsecs:要读取的扇区数量(每个扇区SECT_SIZE = 512字节)。
执行流程 :
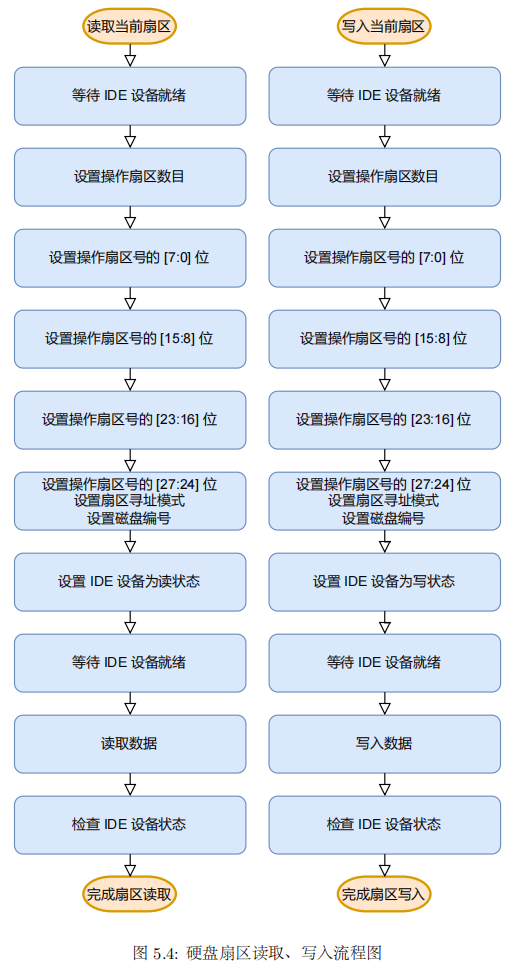
# Exercise 5.3
void ide_read(u_int diskno, u_int secno, void *dst, u_int nsecs) | |
{ | |
uint8_t temp; | |
u_int offset = 0, max = nsecs + secno; | |
panic_on(diskno >= 2); | |
// Read the sector in turn | |
while (secno < max) | |
{ | |
temp = wait_ide_ready(); | |
// Step 1: Write the number of operating sectors to NSECT register | |
temp = 1; | |
panic_on(syscall_write_dev(&temp, MALTA_IDE_NSECT, 1)); | |
// Step 2: Write the 7:0 bits of sector number to LBAL register | |
temp = secno & 0xff; | |
panic_on(syscall_write_dev(&temp, MALTA_IDE_LBAL, 1)); | |
// Step 3: Write the 15:8 bits of sector number to LBAM register | |
/* Exercise 5.3: Your code here. (1/9) */ | |
temp = (secno >> 8) & 0xff; | |
panic_on(syscall_write_dev(&temp, MALTA_IDE_LBAM, 1)); | |
// Step 4: Write the 23:16 bits of sector number to LBAH register | |
/* Exercise 5.3: Your code here. (2/9) */ | |
temp = (secno >> 16) & 0xff; | |
panic_on(syscall_write_dev(&temp, MALTA_IDE_LBAH, 1)); | |
// Step 5: Write the 27:24 bits of sector number, addressing mode | |
// and diskno to DEVICE register | |
temp = ((secno >> 24) & 0x0f) | MALTA_IDE_LBA | (diskno << 4); | |
panic_on(syscall_write_dev(&temp, MALTA_IDE_DEVICE, 1)); | |
// Step 6: Write the working mode to STATUS register | |
temp = MALTA_IDE_CMD_PIO_READ; | |
panic_on(syscall_write_dev(&temp, MALTA_IDE_STATUS, 1)); | |
// Step 7: Wait until the IDE is ready | |
temp = wait_ide_ready(); | |
// Step 8: Read the data from device | |
for (int i = 0; i < SECT_SIZE / 4; i++) | |
{ | |
panic_on(syscall_read_dev(dst + offset + i * 4, MALTA_IDE_DATA, 4)); | |
} | |
// Step 9: Check IDE status | |
panic_on(syscall_read_dev(&temp, MALTA_IDE_STATUS, 1)); | |
offset += SECT_SIZE; | |
secno += 1; | |
} | |
} |
void ide_write(u_int diskno, u_int secno, void *src, u_int nsecs) | |
{ | |
uint8_t temp; | |
u_int offset = 0, max = nsecs + secno; | |
panic_on(diskno >= 2); | |
// Write the sector in turn | |
while (secno < max) | |
{ | |
temp = wait_ide_ready(); | |
// Step 1: Write the number of operating sectors to NSECT register | |
/* Exercise 5.3: Your code here. (3/9) */ | |
temp = 1; | |
panic_on(syscall_write_dev(&temp, MALTA_IDE_NSECT, 1)); | |
// Step 2: Write the 7:0 bits of sector number to LBAL register | |
/* Exercise 5.3: Your code here. (4/9) */ | |
temp = secno & 0xff; | |
panic_on(syscall_write_dev(&temp, MALTA_IDE_LBAL, 1)); | |
// Step 3: Write the 15:8 bits of sector number to LBAM register | |
/* Exercise 5.3: Your code here. (5/9) */ | |
temp = (secno >> 8) & 0xff; | |
panic_on(syscall_write_dev(&temp, MALTA_IDE_LBAM, 1)); | |
// Step 4: Write the 23:16 bits of sector number to LBAH register | |
/* Exercise 5.3: Your code here. (6/9) */ | |
temp = (secno >> 16) & 0xff; | |
panic_on(syscall_write_dev(&temp, MALTA_IDE_LBAH, 1)); | |
// Step 5: Write the 27:24 bits of sector number, addressing mode | |
// and diskno to DEVICE register | |
/* Exercise 5.3: Your code here. (7/9) */ | |
temp = ((secno >> 24) & 0x0f) | MALTA_IDE_LBA | (diskno << 4); | |
panic_on(syscall_write_dev(&temp, MALTA_IDE_DEVICE, 1)); | |
// Step 6: Write the working mode to STATUS register | |
/* Exercise 5.3: Your code here. (8/9) */ | |
temp = MALTA_IDE_CMD_PIO_WRITE; | |
panic_on(syscall_write_dev(&temp, MALTA_IDE_STATUS, 1)); | |
// Step 7: Wait until the IDE is ready | |
temp = wait_ide_ready(); | |
// Step 8: Write the data to device | |
for (int i = 0; i < SECT_SIZE / 4; i++) | |
{ | |
/* Exercise 5.3: Your code here. (9/9) */ | |
panic_on(syscall_write_dev(src + offset + i * 4, MALTA_IDE_DATA, 4)); | |
} | |
// Step 9: Check IDE status | |
panic_on(syscall_read_dev(&temp, MALTA_IDE_STATUS, 1)); | |
offset += SECT_SIZE; | |
secno += 1; | |
} | |
} |
# 文件系统结构
文件系统是 磁盘数据的 “操作系统” ,它赋予原始二进制数据以 结构 和 语义,说明如何划分和解释磁盘的空间,让用户和程序能够以直观的方式(如文件、目录)管理存储设备。而磁盘驱动仅仅是文件系统的 “搬运工”,负责执行底层的读写操作。
# 磁盘块 Block
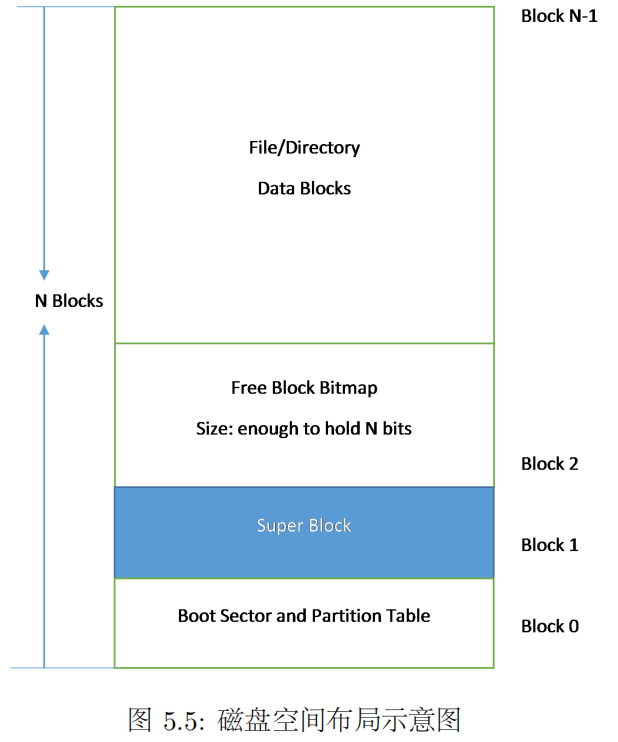
我们将磁盘描述为若干个 磁盘块(Block),每个 Block 大小为 4KB,是操作系统与磁盘交互的最小单位。
对于 N 个磁盘块的磁盘,其中
第一个磁盘块用于启动和存放分区表
第二个磁盘块整个都被分给了 ** 超级块 (super block) **,其 负责存放整个文件系统的基本信息:磁盘大小、根目录位置等
struct Super {
u_int s_magic; // 魔数
u_int s_nblocks; // 磁盘块数
struct File s_root; // 根目录
};
在文件系统中,我们将使用位图 ( Bitmap ) 法来管理空闲的磁盘资源,用一个二进制位 bit 标识磁盘中的一个磁盘块的使用情况(1 表示空闲,0 表示占用)
# Exercise 5.4
void free_block(u_int blockno) | |
{ | |
// You can refer to the function 'block_is_free' above. | |
// Step 1: If 'blockno' is invalid (0 or >= the number of blocks in 'super'), return. | |
/* Exercise 5.4: Your code here. (1/2) */ | |
if (blockno == 0 || blockno >= super->s_nblocks) | |
{ | |
return; | |
} | |
// Step 2: Set the flag bit of 'blockno' in 'bitmap'. | |
// Hint: Use bit operations to update the bitmap, such as b[n / W] |= 1 << (n % W). | |
/* Exercise 5.4: Your code here. (2/2) */ | |
bitmap[blockno / 32] |= 1 << (blockno & 0x1f); | |
} |
# 文件控制块 File
struct File { | |
u_char f_name[MAXNAMELEN]; // 文件名 | |
u_int f_size; // 文件大小 | |
u_int f_type; // 文件类型,分为 FILE_REG(普通文件)和 FILE_DIR(目录文件) | |
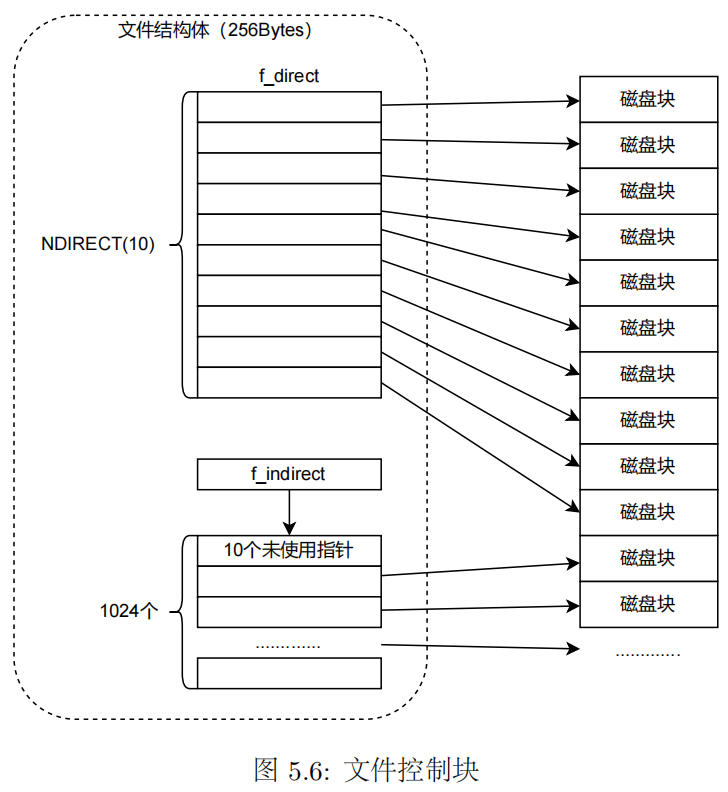
u_int f_direct[NDIRECT]; // 文件的直接指针,其数值表示磁盘中特定磁盘块号,NDIRECT = 10,即可代表至多 10 个磁盘块,共 40KB 的文件大小 | |
u_int f_indirect; // 表示一个间接磁盘块的块号,其中存储了指向文件内容的磁盘块的直接指针(此处我们规定不使用间接磁盘块中的前 10 个直接指针) | |
struct File *f_dir; // 指向文件所属的目录文件 | |
char f_pad[FILE_STRUCT_SIZE - MAXNAMELEN - (3 + NDIRECT) * 4 - sizeof(void *)]; // 占位,为了使得一个 struct File 恰好占据 256 字节(BY2FILE = 256) | |
}__attribute__((aligned(4), packed)); |
# create_file 函数
作用是在给定的目录 dirf 中找到一个空闲的 File 结构体(即一个可用的文件 / 目录项),如果目录已满,则分配一个新的磁盘块来存放新的文件项。
# Exercise 5.5
struct File *create_file(struct File *dirf) | |
{ | |
int nblk = dirf->f_size / BLOCK_SIZE; | |
// Step 1: Iterate through all existing blocks in the directory. | |
for (int i = 0; i < nblk; ++i) | |
{ | |
int bno; // the block number | |
// If the block number is in the range of direct pointers (NDIRECT), get the 'bno' | |
// directly from 'f_direct'. Otherwise, access the indirect block on 'disk' and get | |
// the 'bno' at the index. | |
/* Exercise 5.5: Your code here. (1/3) */ | |
if (i < NDIRECT) | |
{ | |
bno = dirf->f_direct[i]; | |
} | |
else | |
{ | |
bno = ((int *)(disk[dirf->f_indirect].data))[i]; | |
} | |
// Get the directory block using the block number. | |
struct File *blk = (struct File *)(disk[bno].data); | |
// Iterate through all 'File's in the directory block. | |
for (struct File *f = blk; f < blk + FILE2BLK; ++f) | |
{ | |
// If the first byte of the file name is null, the 'File' is unused. | |
// Return a pointer to the unused 'File'. | |
/* Exercise 5.5: Your code here. (2/3) */ | |
if (f->f_name[0] == '\0') | |
{ | |
return f; | |
} | |
} | |
} | |
// Step 2: If no unused file is found, allocate a new block using 'make_link_block' function | |
// and return a pointer to the new block on 'disk'. | |
/* Exercise 5.5: Your code here. (3/3) */ | |
int bno = make_link_block(dirf, nblk); | |
return (struct File *)(disk[bno].data); | |
return NULL; | |
} |
# 块缓存
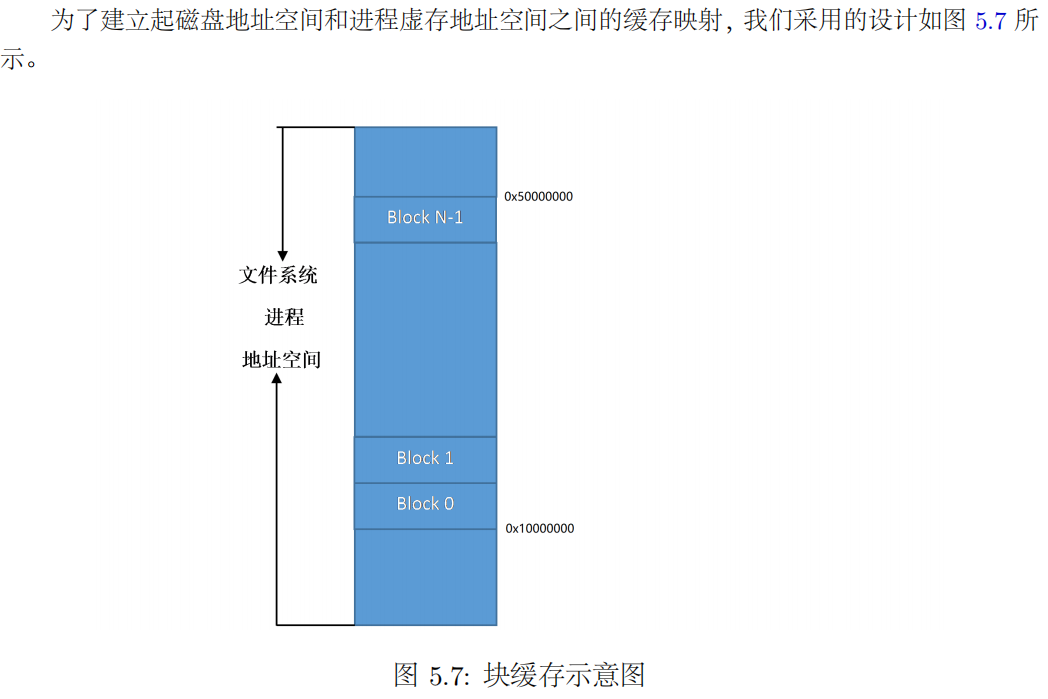
我们的 文件系统是在用户空间内的一个进程,其拥有 4GB 的进程空间,而这个空间是我们实现和磁盘数据交流的一个重要中介。我们将所有磁盘块都按一定规则映射到这个进程空间内,而当我们需要往磁盘写数据时,就从这个进程空间取数据,而读数据时就往这个进程空间存放数据。
注意这个文件系统进程空间和传统的进程空间不同,其将 DISKMAP ~ DISKMAP+DISKMAX (0x10000000~0x4fffffff) 这一大段空间作为缓冲区,当对硬盘上特定磁盘块 Block[id] 进行读写时,其唯一对应于这块缓冲区中一块 512 字节的空间,需要写入的数据会存放在这块空间里等候写入,读出来的信息也会放在这块空间里等候发送给用户进程。这就是块缓存。
# disk_addr 函数
根据一个块的序号 ( block number ),计算这一磁盘块对应的虚存的起始地址
# Exercise 5.6
void *disk_addr(u_int blockno) | |
{ | |
/* Exercise 5.6: Your code here. */ | |
return (void *)(DISKMAP + blockno * BLOCK_SIZE); | |
} |
# map_block 函数、unmap_block 函数
- 当把一个磁盘块中的内容载入到内存中时,需要为之分配对应的物理内存;
- 当结束使用这一磁盘块时,需要释放对应的物理内存以回收操作系统资源。
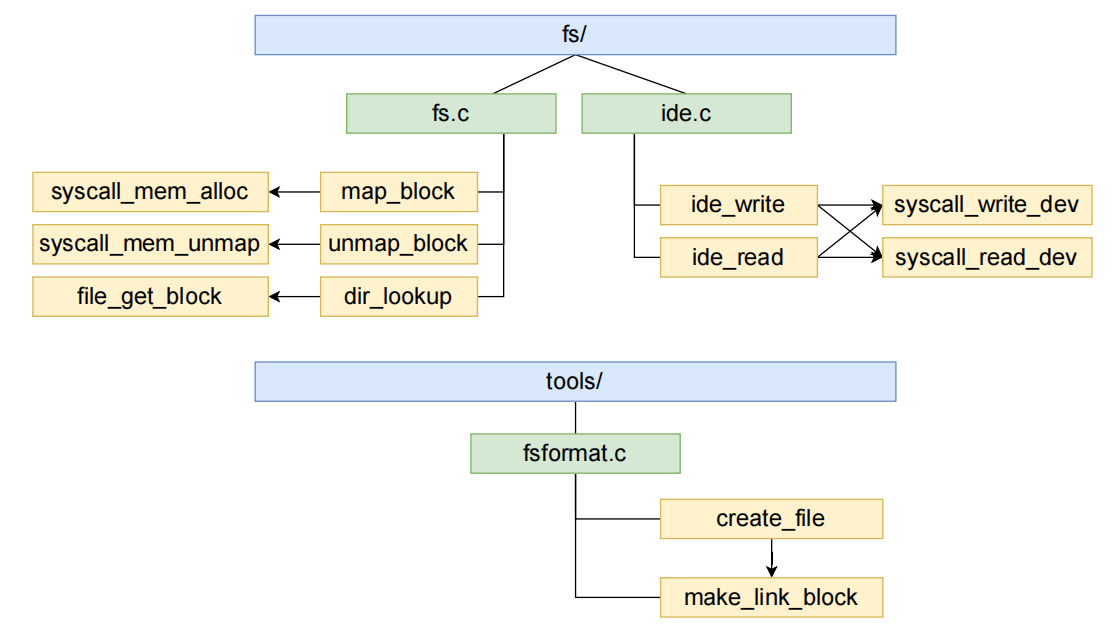
fs/fs.c 中的 map_block 函数和 unmap_block 函数实现了这一功能
# Exercise 5.7
int map_block(u_int blockno) | |
{ | |
// Step 1: If the block is already mapped in cache, return 0. | |
// Hint: Use 'block_is_mapped'. | |
/* Exercise 5.7: Your code here. (1/5) */ | |
if (block_is_mapped(blockno)) | |
{ | |
return 0; | |
} | |
// Step 2: Alloc a page in permission 'PTE_D' via syscall. | |
// Hint: Use 'disk_addr' for the virtual address. | |
/* Exercise 5.7: Your code here. (2/5) */ | |
return syscall_mem_alloc(0, disk_addr(blockno), PTE_D); | |
} |
void unmap_block(u_int blockno) | |
{ | |
// Step 1: Get the mapped address of the cache page of this block using 'block_is_mapped'. | |
void *va; | |
/* Exercise 5.7: Your code here. (3/5) */ | |
va = block_is_mapped(blockno); | |
// Step 2: If this block is used (not free) and dirty in cache, write it back to the disk | |
// first. | |
// Hint: Use 'block_is_free', 'block_is_dirty' to check, and 'write_block' to sync. | |
/* Exercise 5.7: Your code here. (4/5) */ | |
if (!block_is_free(blockno) && block_is_dirty(blockno)) | |
{ | |
write_block(blockno); | |
} | |
// Step 3: Unmap the virtual address via syscall. | |
/* Exercise 5.7: Your code here. (5/5) */ | |
panic_on(syscall_mem_unmap(0, va)); | |
user_assert(!block_is_mapped(blockno)); | |
} |
# read_block 函数、write_block 函数
read_block 函数和 write_block 函数用于读写磁盘块。 read_block 函数将指定编号的磁盘块读入到内存中,首先检查这块磁盘块是否已经在内存中,如果不在,先分配一页物理内存,然后调用 ide_read 函数来读取磁盘上的数据到对应的虚存地址处。
void write_block(u_int blockno) | |
{ | |
// Step 1: detect is this block is mapped, if not, can't write it's data to disk. | |
if (!block_is_mapped(blockno)) | |
{ | |
user_panic("write unmapped block %08x", blockno); | |
} | |
// Step2: write data to IDE disk. (using ide_write, and the diskno is 0) | |
void *va = disk_addr(blockno); | |
ide_write(0, blockno * SECT2BLK, va, SECT2BLK); | |
} |
int read_block(u_int blockno, void **blk, u_int *isnew) | |
{ | |
// Step 1: validate blockno. Make file the block to read is within the disk. | |
if (super && blockno >= super->s_nblocks) | |
{ | |
user_panic("reading non-existent block %08x\n", blockno); | |
} | |
// Step 2: validate this block is used, not free. | |
// Hint: | |
// If the bitmap is NULL, indicate that we haven't read bitmap from disk to memory | |
// until now. So, before we check if a block is free using `block_is_free`, we must | |
// ensure that the bitmap blocks are already read from the disk to memory. | |
if (bitmap && block_is_free(blockno)) | |
{ | |
user_panic("reading free block %08x\n", blockno); | |
} | |
// Step 3: transform block number to corresponding virtual address. | |
void *va = disk_addr(blockno); | |
// Step 4: read disk and set *isnew. | |
// Hint: | |
// If this block is already mapped, just set *isnew, else alloc memory and | |
// read data from IDE disk (use `syscall_mem_alloc` and `ide_read`). | |
// We have only one IDE disk, so the diskno of ide_read should be 0. | |
if (block_is_mapped(blockno)) | |
{ // the block is in memory | |
if (isnew) | |
{ | |
*isnew = 0; | |
} | |
} | |
else | |
{ // the block is not in memory | |
if (isnew) | |
{ | |
*isnew = 1; | |
} | |
try(syscall_mem_alloc(0, va, PTE_D)); | |
ide_read(0, blockno * SECT2BLK, va, SECT2BLK); | |
} | |
// Step 5: if blk != NULL, assign 'va' to '*blk'. | |
if (blk) | |
{ | |
*blk = va; | |
} | |
return 0; | |
} |
# file_get_block 函数
file_get_block 函数用于将某个指定的文件指向的磁盘块读入内存。其主要分为 2 个步骤:
- 为即将读入内存的磁盘块分配物理内存
- 然后使用
read_block函数将磁盘内容以块为单位读入内存中的相应位置。
这两个步骤对应的函数都借助了系统调用来完成。
int file_block_walk(struct File *f, u_int filebno, uint32_t **ppdiskbno, u_int alloc) | |
{ | |
int r; | |
uint32_t *ptr; | |
uint32_t *blk; | |
if (filebno < NDIRECT) | |
{ | |
// Step 1: if the target block is corresponded to a direct pointer, just return the | |
// disk block number. | |
ptr = &f->f_direct[filebno]; | |
} | |
else if (filebno < NINDIRECT) | |
{ | |
// Step 2: if the target block is corresponded to the indirect block, but there's no | |
// indirect block and `alloc` is set, create the indirect block. | |
if (f->f_indirect == 0) | |
{ | |
if (alloc == 0) | |
{ | |
return -E_NOT_FOUND; | |
} | |
if ((r = alloc_block()) < 0) | |
{ | |
return r; | |
} | |
f->f_indirect = r; | |
} | |
// Step 3: read the new indirect block to memory. | |
if ((r = read_block(f->f_indirect, (void **)&blk, 0)) < 0) | |
{ | |
return r; | |
} | |
ptr = blk + filebno; | |
} | |
else | |
{ | |
return -E_INVAL; | |
} | |
// Step 4: store the result into *ppdiskbno, and return 0. | |
*ppdiskbno = ptr; | |
return 0; | |
} |
# dir_lookup 函数
int dir_lookup(struct File *dir, char *name, struct File **file); |
在给定的目录 dir 中查找指定名称 name 的文件或子目录,如果找到,则通过指针 file 返回对应的 File 结构体
计算目录占用的磁盘块数
nblock = dir->f_size / BLOCK_SIZE
遍历目录的每个块,查找目标文件
读取目录的第
i个块调用
file_get_block(dir, i, &blk)获取第i个块的数据指针blk。file_get_block会根据目录的块指针(直接或间接)找到物理块号,并将数据读到内存中。将
blk强制转换为struct File数组files,表示该块中存储的所有文件项。
遍历块中的每个文件项
对每个文件项
f(从files到files + FILE2BLK),调用strcmp(name, f->f_name)比较文件名是否匹配。如果匹配:
- 将
*file指向找到的文件项f。 - 设置
f->f_dir = dir,记录该文件的父目录(方便后续操作)。 - 返回
0表示成功。
- 将
# Exercise 5.8
int dir_lookup(struct File *dir, char *name, struct File **file) | |
{ | |
// Step 1: Calculate the number of blocks in 'dir' via its size. | |
u_int nblock; | |
/* Exercise 5.8: Your code here. (1/3) */ | |
nblock = dir->f_size / BLOCK_SIZE; | |
// Step 2: Iterate through all blocks in the directory. | |
for (int i = 0; i < nblock; i++) | |
{ | |
// Read the i'th block of 'dir' and get its address in 'blk' using 'file_get_block'. | |
void *blk; | |
/* Exercise 5.8: Your code here. (2/3) */ | |
try(file_get_block(dir, i, &blk)); | |
struct File *files = (struct File *)blk; | |
struct File *files = (struct File *)blk; | |
// Find the target among all 'File's in this block. | |
for (struct File *f = files; f < files + FILE2BLK; ++f) | |
{ | |
// Compare the file name against 'name' using 'strcmp'. | |
// If we find the target file, set '*file' to it and set up its 'f_dir' | |
// field. | |
/* Exercise 5.8: Your code here. (3/3) */ | |
if (strcmp(name, f->f_name) == 0) | |
{ | |
*file = f; | |
f->f_dir = dir; | |
return 0; | |
} | |
} | |
} | |
return -E_NOT_FOUND; | |
} |
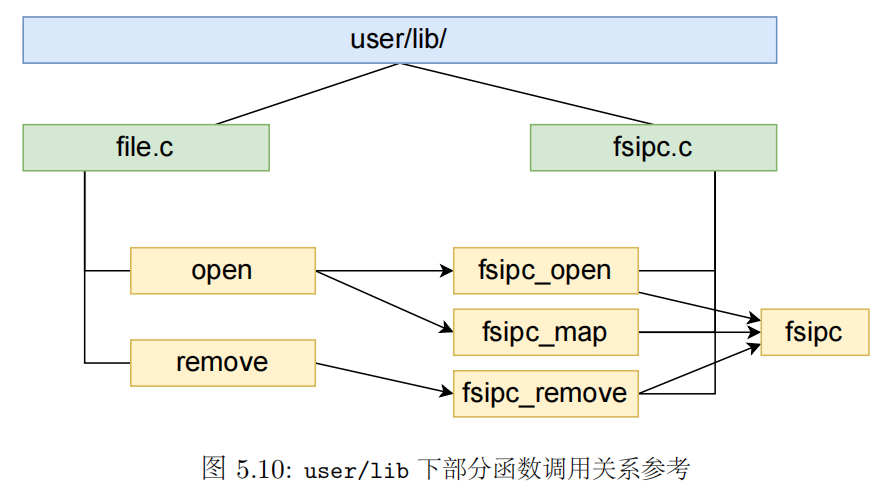
# 文件系统的函数调用参考
# 文件系统的用户接口
在文件系统建立之后,还需要向用户提供相关的使用接口。 MOS 操作系统内核符合一个典型的微内核的设计,文件系统属于用户态进程,以服务的形式供其他进程调用
# 文件描述符
文件描述符( file descriptor )作为用户程序管理、操作文件的基础。它是操作系统给用户程序提供的一个 “文件操作凭证”,你可以把它想象成 “文件的身份证号” 或者 “文件的快捷方式”。
例如:
用户视角:
- 打开文件:
- 调用
open("a.txt"),操作系统返回一个 fd(比如3)。- 这个
3就代表a.txt,后续操作都通过3进行。- 读写文件:
read(3, buf, 100):从a.txt读 100 字节到buf。write(3, "hello", 5):向a.txt写入"hello"。- 关闭文件:
close(3):告诉操作系统 “我用完了”,释放资源。
文件描述符的背后(操作系统视角)
- 描述符表(Descriptor Table):
- 每个进程有一个表(类似 “文件管理本”),记录它打开的所有文件。
- fd 是表的索引(比如
3对应表的第 3 项)。- 表项内容:
- 文件的实际位置(磁盘块号)。
- 当前读写位置(偏移量)。
- 访问权限(只读 / 可写等)。
对应的数据结构为:
struct Fd { | |
u_int fd_dev_id; // 指示了该文件所处的设备 | |
u_int fd_offset; // 指示了当前用户进程对该文件进行操作的指针偏移位置(从文件开头起) | |
u_int fd_omode; // 指示了文件的访问权限 | |
}; | |
struct Filefd { | |
struct Fd f_fd; | |
u_int f_fileid; | |
struct File f_file; | |
}; |
注意 struct Fd.fd_offset ,其描述了用户进程当前在文件操作中的指针位置,该值会在 read 、 write 和 seek 时被修改(定义在 user/fd.c 中)。
可以看出, Filefd 实际上是 Fd 和 File 的组合,并包含了其文件控制块 id
# open 函数
int open(const char *path, int mode); |
用于打开一个文件并返回对应的文件描述符
- 分配一个新的文件描述符
- 通过
IPC请求文件系统服务进程打开文件 - 获取文件内存映射地址,并提取文件信息
- 将文件内容映射到用户空间
- 返回文件描述符
# Exercise 5.9
int open(const char *path, int mode) | |
{ | |
int r; | |
// Step 1: Alloc a new 'Fd' using 'fd_alloc' in fd.c. | |
// Hint: return the error code if failed. | |
struct Fd *fd; | |
/* Exercise 5.9: Your code here. (1/5) */ | |
r = fd_alloc(&fd); | |
if (r) | |
{ | |
return r; | |
} | |
// Step 2: Prepare the 'fd' using 'fsipc_open' in fsipc.c. | |
/* Exercise 5.9: Your code here. (2/5) */ | |
r = fsipc_open(path, mode, fd); | |
if (r) | |
{ | |
return r; | |
} | |
// Step 3: Set 'va' to the address of the page where the 'fd''s data is cached, using | |
// 'fd2data'. Set 'size' and 'fileid' correctly with the value in 'fd' as a 'Filefd'. | |
char *va; | |
struct Filefd *ffd; | |
u_int size, fileid; | |
/* Exercise 5.9: Your code here. (3/5) */ | |
va = fd2data(fd); | |
ffd = (struct Filefd *)fd; | |
size = ffd->f_file.f_size; | |
fileid = ffd->f_fileid; | |
// Step 4: Map the file content using 'fsipc_map'. | |
for (int i = 0; i < size; i += PTMAP) | |
{ | |
/* Exercise 5.9: Your code here. (4/5) */ | |
r = fsipc_map(fileid, i, va + i); | |
if (r) | |
{ | |
return r; | |
} | |
} | |
// Step 5: Return the number of file descriptor using 'fd2num'. | |
/* Exercise 5.9: Your code here. (5/5) */ | |
return fd2num(fd); | |
} |
# write 函数
用于向已打开的文件(通过文件描述符 fdnum 指定)写入数据。它的核心逻辑是 通过文件描述符找到对应的设备和文件信息,然后调用设备驱动的写入方法。
- 通过
fdnum找到对应的Fd结构体 - 通过
Fd找到对应的设备驱动 - 检查文件是否可写
- 调用设备驱动的写入方法
- 更新文件偏移量
int write(int fdnum, const void *buf, u_int n) | |
{ | |
int r; | |
struct Dev *dev; | |
struct Fd *fd; | |
if ((r = fd_lookup(fdnum, &fd)) < 0 || (r = dev_lookup(fd->fd_dev_id, &dev)) < 0) | |
{ | |
return r; | |
} | |
if ((fd->fd_omode & O_ACCMODE) == O_RDONLY) | |
{ | |
return -E_INVAL; | |
} | |
r = dev->dev_write(fd, buf, n, fd->fd_offset); | |
if (r > 0) | |
{ | |
fd->fd_offset += r; | |
} | |
return r; | |
} |
# read 函数
int read(int fdnum, void *buf, u_int n); |
与 write 函数对称,不再赘述
# Exercise 5.10
int read(int fdnum, void *buf, u_int n) | |
{ | |
int r; | |
// Similar to the 'write' function below. | |
// Step 1: Get 'fd' and 'dev' using 'fd_lookup' and 'dev_lookup'. | |
struct Dev *dev; | |
struct Fd *fd; | |
/* Exercise 5.10: Your code here. (1/4) */ | |
if ((r = fd_lookup(fdnum, &fd)) < 0) | |
{ | |
return r; | |
} | |
if ((r = dev_lookup(fd->fd_dev_id, &dev)) < 0) | |
{ | |
return r; | |
} | |
// Step 2: Check the open mode in 'fd'. | |
// Return -E_INVAL if the file is opened for writing only (O_WRONLY). | |
/* Exercise 5.10: Your code here. (2/4) */ | |
if ((fd->fd_omode & O_ACCMODE) == O_WRONLY) | |
{ | |
return -E_INVAL; | |
} | |
// Step 3: Read from 'dev' into 'buf' at the seek position (offset in 'fd'). | |
/* Exercise 5.10: Your code here. (3/4) */ | |
r = dev->dev_read(fd, buf, n, fd->fd_offset); | |
// Step 4: Update the offset in 'fd' if the read is successful. | |
/* Hint: DO NOT add a null terminator to the end of the buffer! | |
* A character buffer is not a C string. Only the memory within [buf, buf+n) is safe to | |
* use. */ | |
/* Exercise 5.10: Your code here. (4/4) */ | |
if (r > 0) | |
{ | |
fd->fd_offset += r; | |
} | |
return r; | |
} |
# 文件系统服务
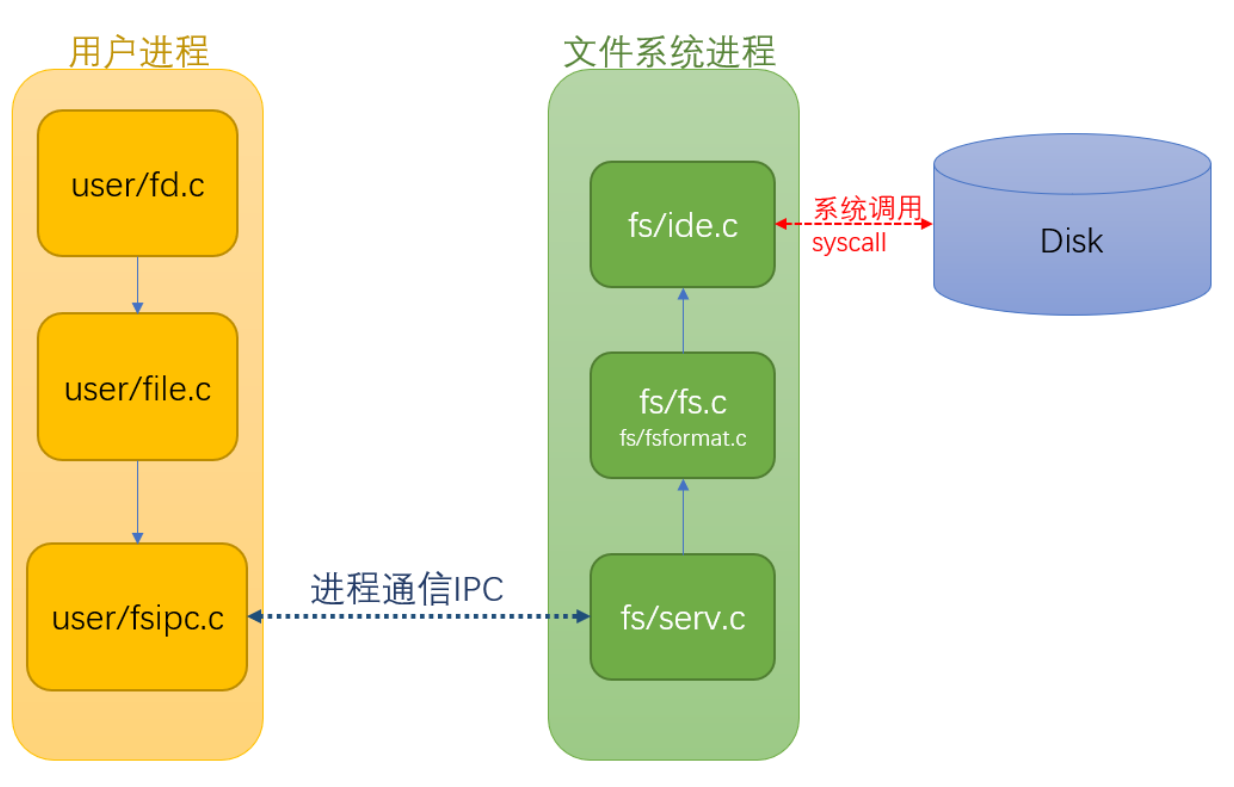
MOS 操作系统中的文件系统服务通过 IPC 的形式供其他进程调用,进行文件读写操作。具体来说,在内核开始运行时,就启动了文件系统服务进程 ENV_CREATE(fs_serv) ,用户进程需要进行文件操作时,使用 ipc_send 、 ipc_recv 与 fs_serv 进行交互,完成操作
fs/serv.c 中
- 服务进程的主函数首先调用了
serve_init函数准备好全局的文件打开记录表opentab - 然后调用
fs_init函数来初始化文件系统。fs_init函数首先通过读取超级块的内容获知磁盘的基本信息- 然后检查磁盘是否能够正常读写
- 最后调用
read_bitmap函数检查磁盘块上的位图是否正确。
- 执行完文件系统的初始化后,调用
serve函数,文件系统服务开始运行,等待其他程序的请求

文件系统支持的请求类型定义在 user/include/fsreq.h 中,包含以下几种:
enum { | |
FSREQ_OPEN, // 请求打开文件,需提供路径和打开模式 | |
FSREQ_MAP, // 请求映射文件内容到内存,需指定文件偏移和目标地址 | |
FSREQ_SET_SIZE, // 请求设置文件大小(如截断文件) | |
FSREQ_CLOSE, // 请求关闭文件,释放相关资源 | |
FSREQ_DIRTY, // 标记文件数据已修改(用于写回磁盘) | |
FSREQ_REMOVE, // 请求删除文件 | |
FSREQ_SYNC, // 请求同步文件数据到磁盘(强制刷盘) | |
MAX_FSREQNO, // 文件系统请求类型的最大值(用于边界检查) | |
}; |
# serve_remove 函数
void serve_remove(u_int envid, struct Fsreq_remove *rq); |
是文件系统 服务进程(serv.c) 中处理 文件删除请求( FSREQ_REMOVE ) 的核心函数。它的
- 调用
file_remove函数删除指定路径的文件 - 通过
IPC返回结果
# Exercise 5.11
void serve_remove(u_int envid, struct Fsreq_remove *rq) | |
{ | |
// Step 1: Remove the file specified in 'rq' using 'file_remove' and store its return value. | |
int r; | |
/* Exercise 5.11: Your code here. (1/2) */ | |
r = file_remove(rq->req_path); | |
// Step 2: Respond the return value to the caller 'envid' using 'ipc_send'. | |
/* Exercise 5.11: Your code here. (2/2) */ | |
ipc_send(envid, r, 0, 0); | |
} |
# fsipc_remove 函数
int fsipc_remove(const char *path); |
是客户端(用户进程) 用于向文件系统服务进程发送 文件删除请求( FSREQ_REMOVE ) 的封装函数
- 验证路径合法性
- 构造删除请求
- 复制路径到请求
- 通过 IPC 发送给服务进程
# Exercise 5.12
int fsipc_remove(const char *path) | |
{ | |
// Step 1: Check the length of 'path' using 'strlen'. | |
// If the length of path is 0 or larger than 'MAXPATHLEN', return -E_BAD_PATH. | |
/* Exercise 5.12: Your code here. (1/3) */ | |
if (path[0] == '\0' || strlen(path) >= MAXPATHLEN) | |
{ | |
return -E_BAD_PATH; | |
} | |
// Step 2: Use 'fsipcbuf' as a 'struct Fsreq_remove'. | |
struct Fsreq_remove *req = (struct Fsreq_remove *)fsipcbuf; | |
// Step 3: Copy 'path' into the path in 'req' using 'strcpy'. | |
/* Exercise 5.12: Your code here. (2/3) */ | |
strcpy((char *)req->req_path, path); | |
// Step 4: Send request to the server using 'fsipc'. | |
/* Exercise 5.12: Your code here. (3/3) */ | |
return fsipc(FSREQ_REMOVE, req, 0, 0); | |
} |
# remove 函数
int remove(const char *path); |
调用 fsipc_remove 请求
# Exercise 5.13
int remove(const char *path) | |
{ | |
// Call fsipc_remove. | |
/* Exercise 5.13: Your code here. */ | |
return fsipc_remove(path); | |
} |
# 函数调用关系参考