# 实验目的
- 创建一个进程并成功运行
- 实现时钟中断,通过时钟中断内核可以再次获得执行权
- 实现进程调度,创建两个进程,并且通过时钟中断切换进程执行
在 Lab3 中将运行一个用户模式的进程。
本实验需要使用数据结构进程控制块 Env 来跟踪用户进程,并建立一个简单的用户进程,加载一个程序镜像到指定的内存空间,然后让它运行起来。
同时,实验实现的 MIPS 内核具有处理异常的能力。
# 进程控制块
# 进程控制块 PCB
进程控制块 (PCB) 是系统专门设置用来管理进程的数据结构,它可以记录进程的外部特征,描述进程的变化过程。系统利用 PCB 来控制和管理进程,所以 PCB 是系统感知进程存在的唯一标志。进程与 PCB 是一一对应的。在 MOS 中,PCB 由一个 Env 结构体实现,主要包含如下一些信息(只展示本次实验用到的)
struct Env { | |
struct Trapframe env_tf; // 保存进程上下文信息的结构体 | |
LIST_ENTRY(Env) env_link; // 链表项,类似于 Lab2 中的 pp_link,用于构造队列 env_free_list | |
u_int env_id; // 每个进程独一无二的标识符 | |
u_int env_asid; // ASID of this env | |
u_int env_parent_id; // 父进程的 env_id,可通过此关联形成树 | |
u_int env_status; // 进程状态,有三种取值:空闲态、阻塞态、就绪运行态 | |
Pde *env_pgdir; // 进程页目录的内核虚拟地址 | |
TAILQ_ENTRY(Env) env_sched_link; // 链表项,用于构造调度队列 env_sched_list | |
u_int env_pri; // 进程优先级 | |
}; |
# env_init 函数
该函数的功能是:
- 初始化空闲
PCB链表 和 已分配的PCB链表 - 初始时,所有
PCB都是空闲的,将它们全部加入空闲链表中。为了使编号较小的PCB优先被分配,即不改变数组中原有顺序,需要 倒序遍历,插入头部 - 我们需要一个模板页目录
base_dir,将两个内核数组(Pages 和 Envs)映射到用户空间(UPAGES 和 UENVS),供用户程序读取。之后每新建一个进程,都会复制这份模板页目录,共享这两个信息(只读)
# Exercise 3.1
void env_init(void) | |
{ | |
int i; | |
/* Step 1: Initialize 'env_free_list' with 'LIST_INIT' and 'env_sched_list' with | |
* 'TAILQ_INIT'. */ | |
/* Exercise 3.1: Your code here. (1/2) */ | |
LIST_INIT(&env_free_list); | |
TAILQ_INIT(&env_sched_list); | |
/* Step 2: Traverse the elements of 'envs' array, set their status to 'ENV_FREE' and insert | |
* them into the 'env_free_list'. Make sure, after the insertion, the order of envs in the | |
* list should be the same as they are in the 'envs' array. */ | |
/* Exercise 3.1: Your code here. (2/2) */ | |
for (i = NENV - 1; i >= 0; i--) | |
{ | |
envs[i].env_status = ENV_FREE; | |
LIST_INSERT_HEAD(&env_free_list, &envs[i], env_link); | |
} | |
/* | |
* We want to map 'UPAGES' and 'UENVS' to *every* user space with PTE_G permission (without | |
* PTE_D), then user programs can read (but cannot write) kernel data structures 'pages' and | |
* 'envs'. | |
* | |
* Here we first map them into the *template* page directory 'base_pgdir'. | |
* Later in 'env_setup_vm', we will copy them into each 'env_pgdir'. | |
*/ | |
struct Page *p; | |
panic_on(page_alloc(&p)); | |
p->pp_ref++; | |
base_pgdir = (Pde *)page2kva(p); | |
map_segment(base_pgdir, 0, PADDR(pages), UPAGES, | |
ROUND(npage * sizeof(struct Page), PAGE_SIZE), PTE_G); | |
map_segment(base_pgdir, 0, PADDR(envs), UENVS, ROUND(NENV * sizeof(struct Env), PAGE_SIZE), | |
PTE_G); | |
} |
# map_segment 函数
void map_segment(Pde *pgdir, u_int asid, u_long pa, u_long va, u_long size, u_int perm); |
功能是在一级页表基地址 pgdir 对应的两级页表结构中做段地址映射,将虚拟地址段 [va, va+size) 映射到物理地址段 [pa, pa+size) 。即区域化的 page_insert 。因为是 按页映射,要求 size 必须是页面大小的整数倍
它在 env_init 中的作用是将内核中的 Page 和 Env 数据结构映射到用户地址,以供用户程序读取
# Exercise 3.2
static void map_segment(Pde *pgdir, u_int asid, u_long pa, u_long va, u_int size, u_int perm) | |
{ | |
assert(pa % PAGE_SIZE == 0); | |
assert(va % PAGE_SIZE == 0); | |
assert(size % PAGE_SIZE == 0); | |
/* Step 1: Map virtual address space to physical address space. */ | |
for (int i = 0; i < size; i += PAGE_SIZE) | |
{ | |
/* | |
* Hint: | |
* Map the virtual page 'va + i' to the physical page 'pa + i' using 'page_insert'. | |
* Use 'pa2page' to get the 'struct Page *' of the physical address. | |
*/ | |
/* Exercise 3.2: Your code here. */ | |
page_insert(pgdir, asid, pa2page(pa + i), va + i, perm); | |
} | |
} |
# env_setup_vm 函数
该函数用于为一个新进程的 PCB 设置初始的虚拟内存布局,即初始化页目录
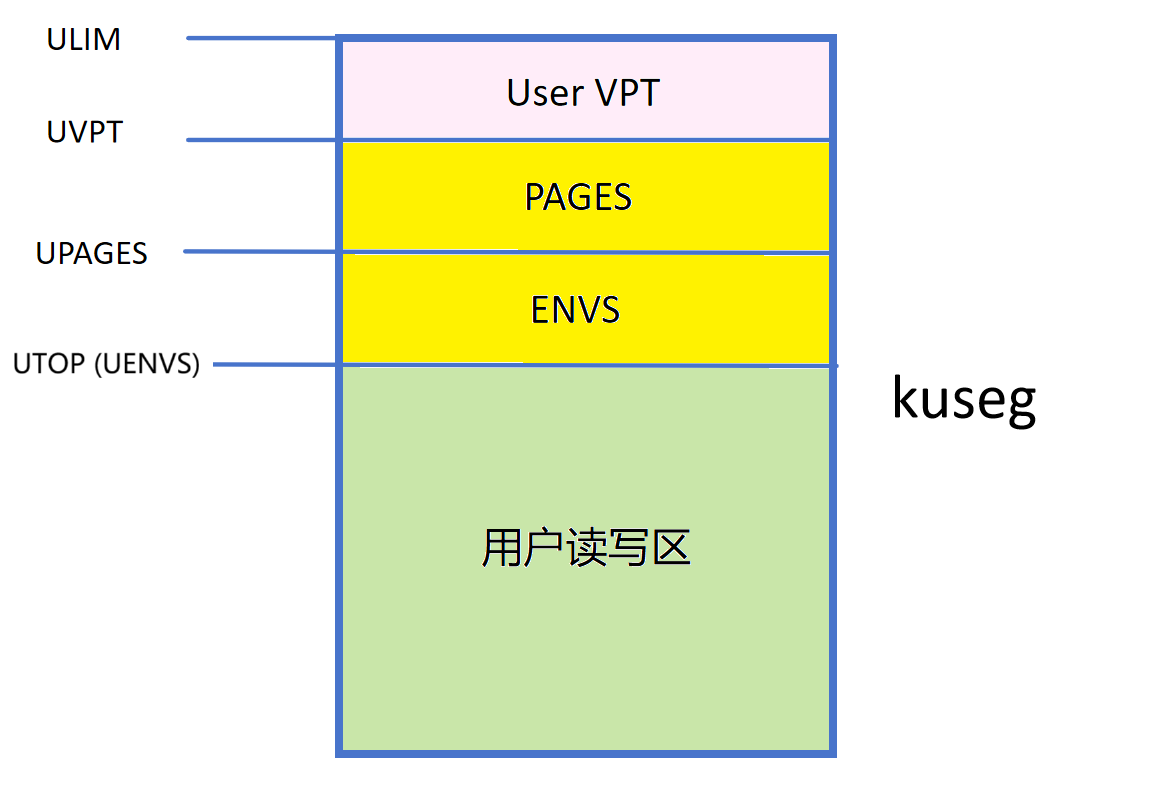
首先需要了解 用户空间的地址划分
首先需要申请一个物理页,作为给
PCB分配的页目录将模板页目录拷贝至该
PCB的页目录,使得进程能够共享Pages和Envs(只读),获取其他进程的信息拷贝范围:
[UTOP , UVPT)中的所有页目录项页表自映射:特殊虚拟地址
UVPT映射到该进程页目录本身的物理地址
# Exercise 3.3
static int env_setup_vm(struct Env *e) | |
{ | |
/* Step 1: | |
* Allocate a page for the page directory with 'page_alloc'. | |
* Increase its 'pp_ref' and assign its kernel address to 'e->env_pgdir'. | |
* | |
* Hint: | |
* You can get the kernel address of a specified physical page using 'page2kva'. | |
*/ | |
struct Page *p; | |
try(page_alloc(&p)); | |
/* Exercise 3.3: Your code here. */ | |
p->pp_ref++; | |
e->env_pgdir = (Pde *)page2kva(p); | |
/* Step 2: Copy the template page directory 'base_pgdir' to 'e->env_pgdir'. */ | |
/* Hint: | |
* As a result, the address space of all envs is identical in [UTOP, UVPT). | |
* See include/mmu.h for layout. | |
*/ | |
memcpy(e->env_pgdir + PDX(UTOP), base_pgdir + PDX(UTOP), | |
sizeof(Pde) * (PDX(UVPT) - PDX(UTOP))); | |
/* Step 3: Map its own page table at 'UVPT' with readonly permission. | |
* As a result, user programs can read its page table through 'UVPT' */ | |
e->env_pgdir[PDX(UVPT)] = PADDR(e->env_pgdir) | PTE_V; | |
return 0; | |
} |
# env_alloc 函数
该函数的功能是申请并初始化一个进程控制块 PCB ,具体工作如下:
取出空闲
PCB调用
env_setup_vm初始化其页目录设置
env_id、env_asid和env_parent_id初始化
CP0_statuse->env_tf.cp0_status = STATUS_IM7 | STATUS_IE | STATUS_EXL | STATUS_UM;
这几个宏代表相应位置 1
IE和IM7置 1,表示中断使能,且 7 号中断(时钟中断)可以被响应EXL置 1,表示强制内核模式。每当异常发生时,EXL会被自动置 1,然后进入异常处理程序;每次eret后,EXL会自动置 0UM置 1,且EXL为 0 时,表示用户模式
初始化栈指针。栈寄存器是第 29 号寄存器,注意这里的栈是 用户栈,不是内核栈。栈是用来处理函数的(比如用户的 main 函数),函数就要传参
USTACKTOP - sizeof(int) - sizeof(char **)sizeof(int)是为argc(参数个数,一个整数)预留空间。sizeof(char **)是为argv(参数向量,一个指向字符串指针数组的指针)预留空间。
将该
PCB从空闲链表中移除并返回
# Exercise 3.4
int env_alloc(struct Env **new, u_int parent_id) | |
{ | |
int r; | |
struct Env *e; | |
/* Step 1: Get a free Env from 'env_free_list' */ | |
/* Exercise 3.4: Your code here. (1/4) */ | |
e = LIST_FIRST(&env_free_list); | |
if (e == NULL) | |
{ | |
return -E_NO_FREE_ENV; | |
} | |
/* Step 2: Call a 'env_setup_vm' to initialize the user address space for this new Env. */ | |
/* Exercise 3.4: Your code here. (2/4) */ | |
try(env_setup_vm(e)); | |
/* Step 3: Initialize these fields for the new Env with appropriate values: | |
* 'env_user_tlb_mod_entry' (lab4), 'env_runs' (lab6), 'env_id' (lab3), 'env_asid' (lab3), | |
* 'env_parent_id' (lab3) | |
* | |
* Hint: | |
* Use 'asid_alloc' to allocate a free asid. | |
* Use 'mkenvid' to allocate a free envid. | |
*/ | |
e->env_user_tlb_mod_entry = 0; // for lab4 | |
e->env_runs = 0; // for lab6 | |
/* Exercise 3.4: Your code here. (3/4) */ | |
try(asid_alloc(&e->env_asid)); | |
e->env_id = mkenvid(e); | |
e->env_parent_id = parent_id; | |
/* Step 4: Initialize the sp and 'cp0_status' in 'e->env_tf'. | |
* Set the EXL bit to ensure that the processor remains in kernel mode during context | |
* recovery. Additionally, set UM to 1 so that when ERET unsets EXL, the processor | |
* transitions to user mode. | |
*/ | |
e->env_tf.cp0_status = STATUS_IM7 | STATUS_IE | STATUS_EXL | STATUS_UM; | |
// Reserve space for 'argc' and 'argv'. | |
e->env_tf.regs[29] = USTACKTOP - sizeof(int) - sizeof(char **); | |
/* Step 5: Remove the new Env from env_free_list. */ | |
/* Exercise 3.4: Your code here. (4/4) */ | |
LIST_REMOVE(e, env_link); | |
*new = e; | |
return 0; | |
} |
# 加载二进制映像
要想正确加载一个 ELF 文件到内存,只需将 ELF 文件中所有需要加载的程序段(programsegment)加载到对应的虚拟地址上即可。
# elf_from 函数
const Elf32_Ehdr *elf_from(const void *binary, size_t size) { | |
const Elf32_Ehdr *ehdr = (const Elf32_Ehdr *)binary; | |
if (size >= sizeof(Elf32_Ehdr) && ehdr->e_ident[EI_MAG0] == ELFMAG0 && | |
ehdr->e_ident[EI_MAG1] == ELFMAG1 && ehdr->e_ident[EI_MAG2] == ELFMAG2 && | |
ehdr->e_ident[EI_MAG3] == ELFMAG3 && ehdr->e_type == 2) { | |
return ehdr; | |
} | |
return NULL; | |
} |
此函数通过强制转换完成了对 ELF 文件的初步解析,并检查各字段是否有效
# elf_load_seg 函数
int elf_load_seg(Elf32_Phdr *ph, const void *bin, elf_mapper_t map_page, void *data) { | |
u_long va = ph->p_vaddr; | |
size_t bin_size = ph->p_filesz; | |
size_t sgsize = ph->p_memsz; | |
u_int perm = PTE_V; | |
if (ph->p_flags & PF_W) { | |
perm |= PTE_D; | |
} | |
int r; | |
size_t i; | |
u_long offset = va - ROUNDDOWN(va, PAGE_SIZE); | |
if (offset != 0) { | |
if ((r = map_page(data, va, offset, perm, bin, | |
MIN(bin_size, PAGE_SIZE - offset))) != 0) { | |
return r; | |
} | |
} | |
/* Step 1: load all content of bin into memory. */ | |
for (i = offset ? MIN(bin_size, PAGE_SIZE - offset) : 0; i < bin_size; i += PAGE_SIZE) { | |
if ((r = map_page(data, va + i, 0, perm, bin + i, MIN(bin_size - i, PAGE_SIZE))) != | |
0) { | |
return r; | |
} | |
} | |
/* Step 2: alloc pages to reach `sgsize` when `bin_size` < `sgsize`. */ | |
while (i < sgsize) { | |
if ((r = map_page(data, va + i, 0, perm, NULL, MIN(sgsize - i, PAGE_SIZE))) != 0) { | |
return r; | |
} | |
i += PAGE_SIZE; | |
} | |
return 0; | |
} |
该函数的功能是将 ELF 文件的一个段加载到内存当中
参数说明:
ph:指向段头的指针,包含段加载信息bin:指向该段二进制数据的指针map_page:页面映射回调函数。每当elf_load_seg函数解析到一个需要加载到内存中的页面,会将有关的信息作为参数传递给回调函数,并由它完成单个页面的加载过程data:传递给回调函数的额外数据
elf_load_seg 函数会从 ph 中获取 va (该段需要被加载到的虚地址)、 sgsize (该段在内存中的大小)、 bin_size (该段在文件中的大小)和 perm (该段被加载时的页面权限),并根据这些信息完成以下两个步骤:
- 加载该段的所有数据(
bin)中的所有内容到内存(va)。 - 如果该段在文件中的内容的大小达不到为填入这段内容新分配的页面大小,即分配了新的页面但没能填满(如 .bss 区域),那么余下的部分用 0 来填充。
elf_load_seg 只关心 ELF 段的结构,而不用处理与具体操作系统相关的页面加载过程
# load_icode_mapper 函数
static int load_icode_mapper(void *data, u_long va, size_t offset, u_int perm, const void *src, size_t len); |
是一个页面级别的内存映射辅助函数,用于在加载 ELF 可执行文件时处理单个页面的映射,是 elf_load_seg 中回调函数 map_page 的实现
参数说明:
data:指向进程控制块的指针va:目标虚拟地址offset:在页面内的偏移量perm:页面权限标志src:源数据指针 (要拷贝的内容)len:要拷贝的数据长度
工作流程:
- 分配一个物理页面
p - 若
src非空,则利用memcpy函数,将其拷贝到页面p中偏移量为offset的位置 - 建立页表映射,利用
page_insert函数,插入到data所指的PCB的页目录中
# Exercise 3.5
static int load_icode_mapper(void *data, u_long va, size_t offset, u_int perm, const void *src, | |
size_t len) | |
{ | |
struct Env *env = (struct Env *)data; | |
struct Page *p; | |
int r; | |
/* Step 1: Allocate a page with 'page_alloc'. */ | |
/* Exercise 3.5: Your code here. (1/2) */ | |
try(page_alloc(&p)); | |
/* Step 2: If 'src' is not NULL, copy the 'len' bytes started at 'src' into 'offset' at this | |
* page. */ | |
// Hint: You may want to use 'memcpy'. | |
if (src != NULL) | |
{ | |
/* Exercise 3.5: Your code here. (2/2) */ | |
memcpy((void *)page2kva(p) + offset, src, len); | |
} | |
/* Step 3: Insert 'p' into 'env->env_pgdir' at 'va' with 'perm'. */ | |
return page_insert(env->env_pgdir, env->env_asid, p, va, perm); | |
} |
# load_icode 函数
static void load_icode(struct Env *e, const void *binary, size_t size); |
这个函数便是完整加载镜像的总函数,通过调用 elf_load_seg 函数来将 ELF 文件真正加载到内存中,将 load_icode_mapper 作为参数传入
工作流程:
根据魔数,验证
ELF文件头的合法性段加载过程。使用宏
ELF_FOREACH_PHDR_OFF遍历所有程序段,对于每个类型为PT_LOAD的段:- 获取段在文件中的偏移量 (
p_offset) - 调用
elf_load_seg加载该段 - 使用
load_icode_mapper作为页面映射回调函数 - 将当前进程控制块
e作为data传递
- 获取段在文件中的偏移量 (
设置程序入口点。将程序计数器 (
cp0_epc) 设置为 ELF 头中指定的入口地址 (e_entry) (虚拟地址)这里的
env_tf.cp0_epc字段指示了进程恢复运行时PC应恢复到的位置。我们要运行的进程的代码段预先被载入到了内存中,且程序入口为e_entry,当我们运行进程时,CPU将自动从PC所指的位置开始执行二进制码
# Exercise 3.6
static void load_icode(struct Env *e, const void *binary, size_t size) | |
{ | |
/* Step 1: Use 'elf_from' to parse an ELF header from 'binary'. */ | |
const Elf32_Ehdr *ehdr = elf_from(binary, size); | |
if (!ehdr) | |
{ | |
panic("bad elf at %x", binary); | |
} | |
/* Step 2: Load the segments using 'ELF_FOREACH_PHDR_OFF' and 'elf_load_seg'. | |
* As a loader, we just care about loadable segments, so parse only program headers here. | |
*/ | |
size_t ph_off; | |
ELF_FOREACH_PHDR_OFF(ph_off, ehdr) | |
{ | |
Elf32_Phdr *ph = (Elf32_Phdr *)(binary + ph_off); | |
if (ph->p_type == PT_LOAD) | |
{ | |
// 'elf_load_seg' is defined in lib/elfloader.c | |
// 'load_icode_mapper' defines the way in which a page in this segment | |
// should be mapped. | |
panic_on(elf_load_seg(ph, binary + ph->p_offset, load_icode_mapper, e)); | |
} | |
} | |
/* Step 3: Set 'e->env_tf.cp0_epc' to 'ehdr->e_entry'. */ | |
/* Exercise 3.6: Your code here. */ | |
e->env_tf.cp0_epc = ehdr->e_entry; | |
} |
# 进程的创建和运行
# env_create 函数
struct Env *env_create(const void *binary, size_t size, int priority); |
这里需要指出,“创建进程” 是指在操作系统内核初始化时直接创建进程,而不是在通过 fork 等系统调用来创建进程。在 Lab4 中将介绍 fork 这一种进程创建的方式。创建进程的过程很简单,就是实现对上述个别函数的封装,分配一个新的 Env 结构体,设置进程控制块,并 将程序载入到目标进程的地址空间 即可完成。
# Exrercise 3.7
struct Env *env_create(const void *binary, size_t size, int priority) | |
{ | |
struct Env *e; | |
/* Step 1: Use 'env_alloc' to alloc a new env, with 0 as 'parent_id'. */ | |
/* Exercise 3.7: Your code here. (1/3) */ | |
panic_on(env_alloc(&e, 0)); | |
/* Step 2: Assign the 'priority' to 'e' and mark its 'env_status' as runnable. */ | |
/* Exercise 3.7: Your code here. (2/3) */ | |
e->env_pri = priority; | |
e->env_status = ENV_RUNNABLE; | |
/* Step 3: Use 'load_icode' to load the image from 'binary', and insert 'e' into | |
* 'env_sched_list' using 'TAILQ_INSERT_HEAD'. */ | |
/* Exercise 3.7: Your code here. (3/3) */ | |
load_icode(e, binary, size); | |
TAILQ_INSERT_HEAD(&env_sched_list, e, env_sched_link); | |
return e; | |
} |
本次实验还没有 fork ,所以也就没有父进程的概念。故 env_alloc 的参数 parent_id 传入默认值 0 即可
# env_run 函数
void env_run(struct Env *e); |
这里运行一个新进程往往意味着是 进程切换 ,而不是单纯的进程运行。进程切换,顾名思义,就是当前进程停下工作,让出 CPU 来运行另外的进程。所以其包含两部分内容:
保存当前进程上下文 (如果当前没有运行的进程就跳过这一步)
我们只需要保存进程的上下文信息,包括通用寄存器、
HI、LO和CP0中的Status,EPC,Cause和BadVAddr寄存器。进程控制块除了env_tf其他的字段在进程切换后还保留在原本的进程控制块中,并不会改变,因此不需要保存在
Lab3中,我们在本实验里的寄存器状态保存的地方是KSTACKTOP以下的一个sizeof(TrapFrame)大小的区域中。curenv->env_tf = *((struct Trapframe)KSTACKTOP - 1)中的curenv->env_tf就是当前进程的上下文所存放的区域。我们将把KSTACKTOP之下的Trapframe拷贝到当前进程的env_tf中,以达到保存进程上下文的效果。恢复要启动的进程的上下文,然后运行该进程。
切换
curenv为即将运行的进程。设置全局变量
cur_pgdir为当前进程页目录地址,在TLB重填时将用到该全局变量。调用
env_pop_tf函数,恢复现场、异常返回。它是定义在
kern/env_asm.S中的一个汇编函数。这个函数也呼应了我们前文提到的,进程每次被调度运行前一定会执行的eret汇编指令。
# Exercise 3.8
void env_run(struct Env *e) | |
{ | |
assert(e->env_status == ENV_RUNNABLE); | |
// WARNING BEGIN: DO NOT MODIFY FOLLOWING LINES! | |
#ifdef MOS_PRE_ENV_RUN | |
MOS_PRE_ENV_RUN_STMT | |
#endif | |
// WARNING END | |
/* Step 1: | |
* If 'curenv' is NULL, this is the first time through. | |
* If not, we may be switching from a previous env, so save its context into | |
* 'curenv->env_tf' first. | |
*/ | |
if (curenv) | |
{ | |
curenv->env_tf = *((struct Trapframe *)KSTACKTOP - 1); | |
} | |
/* Step 2: Change 'curenv' to 'e'. */ | |
curenv = e; | |
curenv->env_runs++; // lab6 | |
/* Step 3: Change 'cur_pgdir' to 'curenv->env_pgdir', switching to its address space. */ | |
/* Exercise 3.8: Your code here. (1/2) */ | |
cur_pgdir = curenv->env_pgdir; | |
/* Step 4: Use 'env_pop_tf' to restore the curenv's saved context (registers) and return/go | |
* to user mode. | |
* | |
* Hint: | |
* - You should use 'curenv->env_asid' here. | |
* - 'env_pop_tf' is a 'noreturn' function: it restores PC from 'cp0_epc' thus not | |
* returning to the kernel caller, making 'env_run' a 'noreturn' function as well. | |
*/ | |
/* Exercise 3.8: Your code here. (2/2) */ | |
env_pop_tf(&curenv->env_tf, curenv->env_asid); | |
} |
# 中断与异常
我们实验里认为中断是异常的一种,并且是 仅有的一种异步异常
协处理器 CP0 :
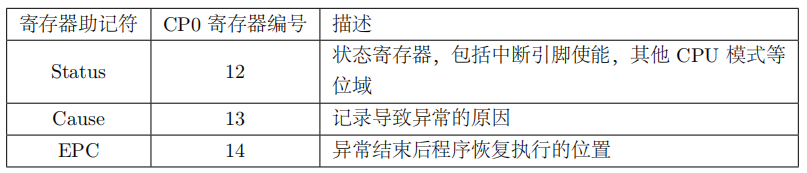
MIPS CPU 处理一个异常时大致要完成四项工作:
- 设置
EPC指向从异常返回的地址。 - 设置
EXL位,强制CPU进入内核态(行使更高级的特权)并禁止中断。 - 设置
Cause寄存器,用于记录异常发生的原因。 CPU开始从异常入口位置取指,此后一切交给软件处理。
# 异常的分发
当发生异常时,处理器会进入一个用于分发异常的程序,这个程序的作用就是检测发生了哪种异常,并调用相应的异常处理程序。
一般来说,异常分发程序会被要求放在 固定的某个物理地址上(根据处理器的区别有所不同),以保证处理器能在检测到异常时正确地跳转到那里。这个分发程序可以认为是操作系统的一部分。
工作流程:
- 使用
SAVE_ALL宏将当前上下文保存到内核的异常栈中。 - 清除
Status寄存器中的UM、EXL、IE位,以保持处理器处于内核态(UM==0)、关闭中断 且 允许嵌套异常。 - 将
Cause寄存器的内容拷贝到t0寄存器中。 - 取得
Cause寄存器中的2~6位,也就是对应的异常码,这是区别不同异常的重要标志。 - 以得到的异常码作为索引在
exception_handlers数组中找到对应的中断处理函数,后文中会有涉及。 - 跳转到对应的中断处理函数中,从而响应了异常,并将异常交给了对应的异常处理函数去处理
链接:
.text.exc_gen_entry 段和 .text.tlb_miss_entry 段需要被链接器放到特定的位置。在 4Kc 中,这两个段分别要求放到地址 0x80000180 和 0x80000000 处,它们是异常处理程序的入口地址。在我们的系统中:
CPU发生异常(除了用户态地址的TLB Miss异常)后,就会自动跳转到地址0x80000180处;- 发生用户态地址的
TLB Miss异常时,会自动跳转到地址0x80000000处。开始执行。
# Exercise 3.9
exc_gen_entry: | |
SAVE_ALL | |
mfc0 t0, CP0_STATUS | |
and t0, t0, ~(STATUS_UM | STATUS_EXL | STATUS_IE) | |
mtc0 t0, CP0_STATUS | |
/* Exercise 3.9: Your code here. */ | |
andi t0, 0x7c | |
lw t0, exception_handlers(t0) | |
jr t0 |
# Exercise 3.10
SECTIONS { | |
/* Exercise 3.10: Your code here. */ | |
. = 0x80000000; | |
.tlb_miss_entry : { | |
*(.text.tlb_miss_entry) | |
} | |
. = 0x80000180; | |
.exc_gen_entry : { | |
*(.text.exc_gen_entry) | |
} | |
//..... | |
} |
# 异常向量组
异常分发程序通过 exception_handlers 数组定位中断处理程序,而 exception_handlers 就称作异常向量组
extern void handle_int(void); | |
extern void handle_tlb(void); | |
extern void handle_sys(void); | |
extern void handle_mod(void); | |
extern void handle_reserved(void); | |
void (*exception_handlers[32])(void) = { | |
[0 ... 31] = handle_reserved, | |
[0] = handle_int, // 中断,由时钟中断、控制台中断造成 | |
[1] = handle_mod, // 存储异常,进行存储操作时该页被标记为只读 | |
[2 ... 3] = handle_tlb, // 2 号寄存器为 TLB_load 异常,3 号寄存器为 TLB_store 异常 | |
[8] = handle_sys, // 系统调用,用户进程通过执行 syscall 指令陷入内核 | |
}; |
一旦初始化结束,有异常产生,那么其对应的处理函数就会得到执行。而我们在本 Lab 中,主要使用 0 号异常,即中断异常的处理函数我们接下来要做的,就是产生并处理时钟中断,利用时钟中断进行抢占式进程调度。
# 时钟中断
中断处理的流程:
- 通过异常分发,判断出当前异常为中断异常,随后进入相应的中断处理程序。在
MOS中即对应handle_int函数。 - 在中断处理程序中进一步判断
Cause寄存器中是由几号中断位引发的中断,然后进入不同中断对应的中断服务函数。 - 中断处理完成,通过
ret_from_exception函数恢复现场,继续执行。
时钟中断与 MOS 系统的时间片轮转调度算法是紧密相关的。时间片轮转调度 是一种进程调度算法,每个进程被分配一个时间段,称作它的时间片,即该进程允许运行的时间。
- 如果在时间片结束时进程还在运行,则该进程将挂起,切换到另一个进程运行。
- 如果该进程在时间片结束前阻塞或者结束,则立即切换到另一个进程运行。
4KC 中的 CP0 内置了一个可产生中断的 Timer , MOS 即使用这个内置的 Timer 产生时钟中断。CP0 中存在两个用于控制此内置 Timer 的寄存器,即 Count 寄存器与 Compare 寄存器。
Count寄存器会按照某种仅与处理器流水线频率相关的频率不断自增,而Compare寄存器维持不变。- 当
Count寄存器的值与Compare寄存器的值相等且非 0 时,时钟中断会被立即触发。
RESET_KCLOCK 宏将 Count 寄存器清零并将 Compare 寄存器配置为我们所期望的计时器周期数,这就对 Timer 完成了配置。在设定个时钟周期后,时钟中断将被触发。
# Exercise 3.11
.macro RESET_KCLOCK | |
li t0, TIMER_INTERVAL | |
/* Exercise 3.11: Your code here. */ | |
mtc0 zero, CP0_COUNT | |
mtc0 t0, CP0_COMPARE | |
.endm |
# 进程调度
handle_int 函数的最后跳转到了 schedule 调度函数,调度算法即上文提到的 时间片轮转算法
调度函数 schedule 被调用时,当前正在运行的进程被存储在全局变量 curenv 中(在第一个进程被调度前为 NULL ),其剩余的时间片长度被存储在静态变量 count 中。
需要进行进程切换,包括以下几种情况:
尚未调度过任何进程(
curenv==NULL)当前进程已经用完了时间片
当前进程不再就绪(如被阻塞或退出)
yield 参数指定必须发生切换
我们还需要判断当前进程是否仍然就绪:
- 如果是,则将其移动到调度链表的尾部。之后,我们选中调度链表头部的进程来调度运行,将剩余时间片长度设置为其优先级。
- 如果不是,直接切换链表头部的进程
无需进行切换时:
count--- 调用
env_run函数,继续运行当前进程curenv
# Exercise 3.12
void schedule(int yield) | |
{ | |
static int count = 0; // remaining time slices of current env | |
struct Env *e = curenv; | |
/* Exercise 3.12: Your code here. */ | |
if (yield || count == 0 || e == NULL || e->env_status != ENV_RUNNABLE) | |
{ | |
if (e != NULL && e->env_status == ENV_RUNNABLE) | |
{ | |
TAILQ_REMOVE(&env_sched_list, e, env_sched_link); | |
TAILQ_INSERT_TAIL(&env_sched_list, e, env_sched_link); | |
} | |
e = TAILQ_FIRST(&env_sched_list); | |
if (e == NULL) | |
{ | |
panic("schedule: no runnable envs\n"); | |
} | |
count = e->env_pri; | |
} | |
count--; | |
env_run(e); | |
} |
# 思考题
# Thinking 3.1
请结合 MOS 中的页目录自映射应用 解释代码中 e->env_pgdir[PDX(UVPT)]= PADDR(e->env_pgdir) | PTE_V 的含义。
将特殊虚拟地址
UVPT映射到该进程页目录本身的物理地址,使进程可以直接访问自己的页目录和页表
# Thinking 3.2
elf_load_seg 以函数指针的形式,接受外部自定义的回调函数 map_page 。请你找到与之相关的 data 这一参数在此处的来源,并思考它的作用。没有这个参数可不可以?为什么?
- 来源:在加载镜像的总函数
load_icode中,调用了elf_load_seg函数来将ELF文件真正加载到内存中,将当前的进程控制块e作为data传入- 作用:作为回调函数
load_icode_mapper的参数,使得该函数知晓将要添加映射的是哪个进程控制块- 显然不可以没有这个参数,不然找不到当前进程,无法把映射关系添加到它的页目录中
# Thinking 3.3
结合 elf_load_seg 的参数和实现,考虑该函数需要处理哪些页面加载的情况。
- 地址未对齐:先处理第一页的碎片部分,剩下的就对齐了
- 从
offset之后的位置开始,按页对齐逐页加载文件内容。每次调用map_page加载一页(PAGE_SIZE字节),直到文件内容全部加载完毕。如果最后一页不足PAGE_SIZE,只加载剩余部分- 段在内存中的大小(
sgsize)可能大于文件中的大小(bin_size)。对超出文件大小的部分(i >= bin_size),分配空白页面(通过map_page传递NULL数据指针),即清零。
# Thinking 3.4
你认为这里的 env_tf.cp0_epc 存储的是物理地址还是虚拟地址?
虚拟地址。
PC是CPU中用于记录当前运行代码在内存中的地址的寄存器,而CPU发出的地址并不是物理地址,而是当前运行进程地址空间中的虚拟地址
# Thinking 3.5
在
kern/genex.S中实现
.macro BUILD_HANDLER exception handlermove a0, sp.endm
jal \handler会跳转到真正的异常处理函数中去
# Thinking 3.6
阅读 entry.S 、 genex.S 和 env_asm.S 这几个文件,并尝试说出时钟中断在哪些时候开启,在哪些时候关闭。
RESET_KCLOCK宏将Count寄存器清零并将Compare寄存器配置为我们所期望的计时器周期数,这就对Timer完成了配置。在设定个时钟周期后,时钟中断将被触发。从代码角度,就是在env_pop_tf中调用了宏RESET_KCLOCK,随后又在宏RESTORE_ALL中恢复了Status寄存器,开启了中断。在
entry.S中,当从用户态通过异常 / 中断陷入内核态时,硬件会自动关闭中断,以确保内核代码的原子性执行。
# Thinking 3.7
阅读相关代码,思考操作系统是怎么根据时钟中断切换进程的。
每次产生时间中断,操作系统都会将当前进程的时间片减 1;
当前进程的时间片为 0 时,将其移至队尾并重置时间片,然后切换到调度队列的队头进程